
How To Adjusting The Bicycle Mechanical Disc Brakes
How to Adjusting Mechanical Disc Brakes
Disc brakes have been used in most mountain bikes today, and also they are available on road bikes. The braking force is applied to a disc rotor that is bolted directly to the bike wheel hub. Comparing to the brake, they provide more stopping power and better performance in bad weather.
There are mechanical disc brakes and hydraulic (oil) disc brakes. Here we will show how to adjust the mechanical disc brakes.
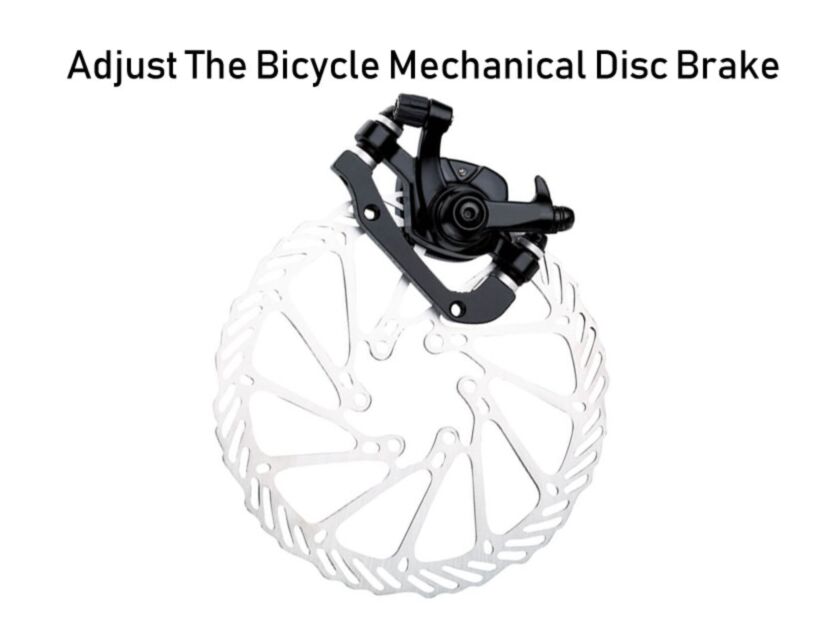
Basic knowledge of the bicycle mechanical disc brake.
Parts: Rotor, Calliper, Cable, Brake pads
Screws:
1 and 2, for mounting the calliper.
3 and 4, for adjusting the distances between the rotor and both sides.
5, for fixing the brake cable.
6 and 7, for adjusting the gap width of the disc brake rotor.


How do the mechanical disc brakes work?
Most mechanical disc brakes have one brake pad that stays stationary (the inside one), and the other one brake pad that moves (the outside one) in order to apply pressure to the rotor. The disc brake rotor actually flexes toward the stationary pad so it’s squeezed between the two pads.
Adjusting Steps:
Before adjusting your disc brakes, you should ensure the disc rotor is flat. If any part of it is curved, you need to adjust it flat with a wrench slightly.
Then you could adjust the position of the caliper itself by loosening screws 3 and 4, you can move the caliper slightly from side to side.


With the brake arm in the rested position (ie. no tension on the cable), you want to position the caliper so the moving pad (outside), is just about as close to the caliper as possible, without rubbing. Then re-tighten those caliper mounting bolts, alternating until they are both tight. Spin the wheel to make sure there is no rubbing on any point on the rotor (sometimes the rotor can be slightly out of true).

Next, you want to set the position of the inside stationary pad. On the back side of the rotor, there is a nut that can be turned to move the pad in or out. Turning it clockwise will move it toward the rotor, counter-clockwise will move it away. You actually want this pad to be a bit farther away from the rotor than the moving pad. A ratio of 2:1 is a good place to start, making the stationary pad gap twice as wide as the moving pad gap.
Squeeze the brake lever to test the caliper. The brake should fully engage before the lever is pulled back to the handlebar. If you’re able to pull the lever all the way to the handlebar, or they feel too soft, move the stationary pad even closer to the rotor. If you were unable to get the moving pad as close to the rotor as you’d like by simply positioning the caliper, you can move that one in by turning the barrel adjuster counter-clockwise. This will put more tension on the brake cable. In extreme situations, you can even loosen the cable pinch bolt, and pull more cable through. This will actually cause the brake arm to be slightly engaged in the rested position (however this isn’t usually recommended by brake manufacturers).

As you ride, brake pads do wear and become thinner. When braking power decreases, adjust the pads closer to the rotor. Be sure to keep on eye on them and replace when necessary. If you’re ever unsure about your work, have it checked by a professional bike mechanic.
Enjoy your riding.

Sign In
Create New Account