
What is the best electric bike conversion kit on elecycles.com
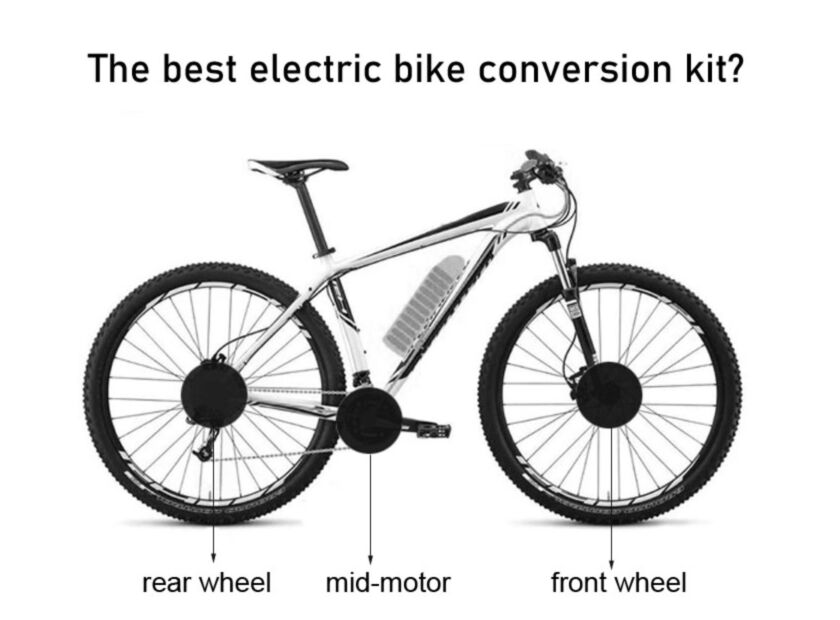
What is the best electric bike conversion kit on ELECYCLES?
You can see on the elecycles.com that there are many different electric bike conversion kits,
what is the best electric bike conversion kit? Does it fit your bicycle?...
To help you to choose the right electric bike kit here, we prepare this article.
Here you will learn.
- What electric bike conversion kits do we have
- What is the advantage and disadvantage of these electric bike conversion kits
- How to install the electric bike conversion kit
- Comparison of the different electric bike conversion kits
- What is the best electric bike kit
1. What electric bike conversion kit we have?
In ELECYCLES, You will find different kinds of electric bike conversion kits.
(1) Electric bike conversion kit front wheel- iMortot1, iMortor3, EEKit
(2) Electric bike conversion kit rear wheel- 3000W electric bike conversion kit, fat tire electric bike conversion kit, SMA-Q rear motor kit, 250W-1500W rear hub motor electric bike kit
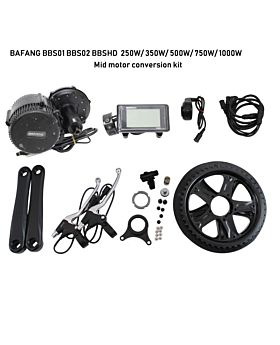
(3) Mid motor electric bike conversion kit- BAFANG BBS 250W-1000W, Tongsheng TSDZ2 Mid Drive Motor E-bike Kit
2. What is the advantage and disadvantage of the electric bike conversion kit?
(1) Electric bike conversion kit front wheel Advantage & Disadvantage
Advantage
- Easy and fast to install or remove – Anyone even a green hand could complete the installation following the instruction, there is no need to handle the gear systems (chain, derailleur, etc.).
- Low cost - The front electric bike kit is a good choice for a wallet factor.
- Fits most bikes - It fits all bikes with a front fork of standard mount size ( like 100*10mm quick release, 110*15mm thru-axle, etc.), No matter what is the bike wheel size- 20”, 24”, 26” or 29” or 700C, and no matter what is the transmission system- traditional gears with cogs, chain, and derailleurs, or internally geared hubs (IGH) with a chain or belt drive.
-Easy to achieve balance - it provides a more balanced bike weight distribution if the battery is mounted in the middle or back part of the bike.
Disadvantage
- It needs a sturdy fork - especially for the higher-powered motor wheel, a torque arm is recommended to mount on the front fork.
- Focus on small power - 250W or 350W- compared the frame of the bike (rear hub motors), the front fork does not provide as strong as of the structure.
- Can lose traction when it is slippery - there is much less weight over the front wheel than the rear wheel, the wheel may spin accelerating and lose traction when climbing a steep hill or on loose layer roads (dirt, sand, snow, etc.)
(2) Electric bike conversion kit rear wheel Advantage & Disadvantage
Advantage
- Low cost - The rear electric bike kit is a good choice considering your wallet.
- Excellent traction - When the motor is at the rear it becomes a bit back heavy and gets better traction when climbing or on the loose layer roads(dirt, sand, snow, etc).
-Wide range of power ( from 250W to 3000W or higher) - A rear hub motor wheel could be steadily mounted because of the excellent support from the frame.
Disadvantage
- A bit difficult to install or remove - you need to fit all the gears (chain, derailleur, etc.) in the right place when installing the rear motor wheel.
- Need to keep safe from the front wheel which off the ground - a really powerful rear motor makes a back-heavy bike which may lead to the front wheel off the ground especially when climbing or with rear heavy loading.
(3) Mid motor electric bike conversion kit Advantage & Disadvantage
Advantage
-Excellent traction - The motor drives the chain and back wheel where most of the weight is-Better handling - Rear-wheel drive feels more smooth and more comfortable to handle
-Steadily mounted - The frame supports the motor well
-More effective motor - It uses the existing gears of the bike for power efficiency
-Low gravity - Low gravity gives you better handling and balance
Disadvantage
- More wear on the chain and gears - As it is using the existing chain and sprockets for efficiency there is also more wear to them-Susceptible to damages from gravel and curbs - As the motor sits underneath the bike, it can get hit by rocks flying up or high curbs
-Expensive - Cost a bit more than a hub-motor but truly is the best electric bike kit out there
3. How to install the electric bike conversion kit?
Every different electric bike conversion kit may need different tools and different steps to complete the convert installation.
You will see the detailed steps in the following description.
4. Comparison of the different electric bike conversion kit
|
No. |
Name |
Type |
Motor Power |
Max speed |
Installation difficulty |
Recommend |
|
A |
iMortor1 |
Front-wheel e-bike kit |
36V 240W |
25km/h |
Low |
★★★★ |
|
B |
iMortor3 |
Front-wheel e-bike kit |
36V 350W |
35km/h |
Low |
★★★★ |
|
C |
EEKit |
Front-wheel e-bike kit |
36V 250W |
32km/h |
Low |
★★★★★ |
|
D |
SMA-Q |
Rear-wheel e-bike kit |
36V 250W |
32km/h |
Medium |
★★★ |
|
E |
G-EBK |
Rear-wheel e-bike kit |
36V 250W or 350W or 500W, 48V 500W or 750W or 1000W |
25-40 km/h |
Medium |
★★ |
|
F |
BAFANG BBS |
Mid motor kit |
36V or 48V, 250W or 350W or 500W or 750W or 1000W |
25-40 km/h |
High |
★★★★ |
|
G |
TSDZ2 |
Mid motor kit |
36V or 48V, 250W or 350W |
25 km/h |
High |
★★★★ |
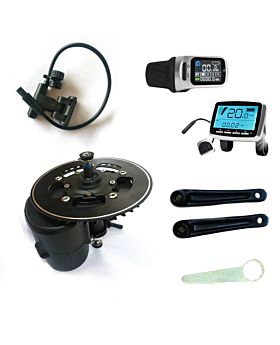
A. Electric bike conversion kit front wheel- iMortor1

|
Feature Motor: 36V 240W Gearless Motor working torque: 5.5Nm Battery: 36V 3.2Ah lithium battery. Charge time 3 hours. Max speed: 25km/h ( 15.4mph, could be limited by setting) Range: 35km( 21.7 miles). Weight: 18.5 pounds. Smartphone App: Yes ( APP version only). iPhone and Android compatible. Wheel size options: 20”, 24”, 26”, 29”, 700C
|
Package including Front-wheel ( Tire+ rim+ spokes+ motor + controller) * 1 Battery * 1 Charger * 1 Brake sensor * 1 PAS sensor * 1 4-in-1 wire * 1 LCD with thumb throttle * 1 ( for the LCD version only) Thumb throttle * 1 (for the Bluetooth APP version only) Phone holder * 1 (for the Bluetooth APP version only) Nut and washer set * 1 Toolset * 1 Manual *1
|
What is the advantage of iMortor1 e-bike kit?
(1) All-in-one- motor, controller, battery are gathered in one wheel, it is easy and fast to install.
(2) Street legal, the max speed is 25km/h and it could be smaller by phone APP setting.
(3) Different Rim and tires for choice to fit almost all bikes, 20”, 24”, 26”, 700C, 27.5”, 29”, with different tire width such as 1.75”, 1.95”, 2.125" etc.
(4) Removable battery for charging at home easily.
(5) 5V USB output for charging your phone in urgent.
(6) Integrated waterproof cables.
(7) LCD or Bluetooth phone APP version for option.
(8) Phone holder ( for APP version only).
What is the disadvantage of iMortor1 e-bike kit?
(1) The motor, controller, battery are all gathered in the front wheel, which makes the front wheel heavier that steering is not sensitive, and there are traction problems with low speed or climbing.
(2) When running, the motor and battery temperature would rise, as the motor, controller, battery are all gathered together that the heat would affect all the system’s efficiency and lifetime.
(3) It needs a little more time to complete the installation as their different parts should be connected- motor, throttle, PAS, brake sensor, Phone holder.
(4) The phone APP and LCD display are alternatives. When you choose an LCD display, you could not use the phone APP.
(5) It works with a front fork with 100*10mm quick released, not with 110*15mm thru-axle.
How to install the front wheel electric bike conversion kit iMortor1?
Step 1: Take off the brake clamp, take off the front wheel from your bike.
Step 2: Install the new iMortor1 wheel (without the battery) on your bike. Test the rotation of the iMortor, and then fix it with the washers and nuts.

Step 3: Install the brake clamp.
Step 4: Remove the right grip, slid the LCD display or the thumb throttle onto the handlebar, re-install the grip.
Step 5: Install the pedal-assist system (optional). Place the pedal-assist magnet rotor beside the left pedal arm, fix the pedal-assist sensor on the left side of the frame ( the sensor aligns to the magnet ).
Step 6: Install the battery on the iMortor1 wheel.
Step 7: Connect the 1-to-4 wire to the motor, connect the throttle, PAS, brake sensor wires according to the connector colors.
Step 8: Test everything to make sure the iMorto1 e-bike kit works, and everything is fastened properly. Zip-tie all the cables neatly to the frame.
Step 9: Go out for a test ride and enjoy your new electric bike!
You can read the iMortor1 manual before installation and use.
B. Electric bike conversion kit front wheel- iMortor3

|
Feature Motor: 36V 350W Gearless Motor working torque: 7Nm Battery: 36V 7.2Ah lithium battery. Charge time 4 hours. Max speed: 40km/h ( 24.9mph, could be limited by setting) Range: 50km (31 miles). Weight: 18.5 pounds. Smartphone App: Yes ( APP version only). iPhone and Android compatible. Wheel size options: 24”, 26”, 29”, 700C |
Package including Front-wheel ( Tire+ rim+ spokes+ motor + controller) * 1 Battery * 1 Charger * 1 LCD with thumb throttle * 1 ( for the LCD version only) Thumb throttle * 1 (for the Bluetooth APP version only) Phone bracket * 1 (for the Bluetooth APP version only) Nut and washer set * 1 Toolset * 1 Manual *1 |
What is the advantage of iMortor3 e-bike kit?
(1) All-in-one - motor, controller, battery are gathered in one wheel, it is easy and fast to install.
(2) No need the install the pedal assist sensor, nor the brake sensor, easier and faster for installation.
(3) Different Rim and tires for choice to fit many bikes, 24”, 26”, 700C, 27.5”, 29”, with different tire width such as 1.75”, 1.95”, 2.125" etc.
(4) The removable battery is easily taken off to charge at home.
(5) You don’t need to connect any wire ( APP version) or connect only one wire (LCD version)
(6) 5V USB output for charging your phone in urgent.
(7) Phone holder(APP version only).
(8) You could use the extra battery(optional) through the battery expanded line, which could ride a longer distance with the battery.
What is the disadvantage of iMortor3 e-bike kit?
(1) The motor, controller, battery are all gathered in the front wheel, which makes the front wheel heavier that steering is not sensitive, and there are traction problems with low speed or climbing.
(2) When running, the motor and battery temperature would rise, as the motor, controller, battery are all gathered together that the heat would affect all the system’s efficiency and lifetime.
(3) The phone APP and LCD display are alternatives. When you choose an LCD display, you could not use the phone APP.
(4) The front fork on your bike should be strong, it would be better to use a torque arm.
(5) It works with a front fork with 100*10mm quick released, not with 110*15mm thru-axle.
How to install the front wheel electric bike conversion kit iMortor3?
Step 1: Take off the brake clamp, take off the front wheel from your bike.
Step 2: Install the new iMortor3 wheel(without the battery) on your bike. Test the rotation of the iMortor3, and then fix it with the washers and nuts.
Step 3: Install the brake clamp.
Step 4: Remove one grip, slid the LCD display onto the handlebar, connect the wire to the motor.
Step 5: Test everything to make sure iMortor2 e-bike kit works, and everything is fastened properly. Zip-tie the wire neatly to the frame. ( For the iMortor3 with APP, please skip the step four and step five)
Step 6: Go out for a test ride and enjoy your new electric bike!
You can read the iMortor3 manual before installation and use.
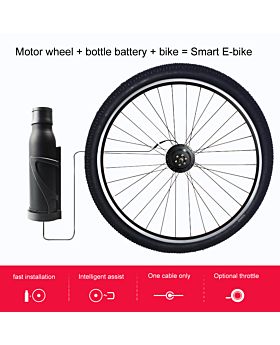
C. Electric bike conversion kit front wheel- EEKit

|
Feature Motor: 36V 250W Geared Motor torque: 30Nm Battery: 36V 7Ah LG lithium battery. Charge time 3 hours. Max speed: 32km/h ( 19.9mph, could be limited by setting) Range: 65km (40mi ). Weight: 13.7 pounds. Smartphone App: Yes. iPhone and Android compatible. Wheel size options: 20”, 26”, 27.5”, 700C, 29” Connected cables: 2
|
Package including Front wheel ( Tire+ rim+ spokes+ motor ) * 1 Battery + controller * 1 Charger * 1 Bluetooth LCD * 1 ( Optional) Thumb throttle * 1 Nut and washer set * 1 Toolset * 1 Manual *1
|
What is the advantage of EEKit e-bike kit?
(1) Street legal, the max speed is 32km/h and it could be limited to 25km/h or smaller by phone APP setting.
(2) Installation is easy and fast. You need to connect two cables only- one from the controller to the motor, the other from the controller to the thumb throttle ( you could ride without throttle, with the pedal assist function only ), which could convert a bike to an e-bike in 5 minutes. Wireless LCD display installed fast without a cable connection.
(3) There are a wireless module and gyro sensor and in the controller, could sense the speed and brake to offer different levels of assist power and cut off the power when brake, do not need the PAS and electric brakes.
(4) Different Rim and tires for choice to fit almost all bikes, 20”, 26”, 700C, 27.5”, 29”, with different tire width such as 1.75”, 1.95” etc.
(5) 36V removable bottle battery is easily taken off to charge at home.
(6) Waterproof cables, battery and controller and motor well seal, the grade is IP65.
(7) The system is smooth, stable, intelligent and lightweight (about 6kg/ 13.2lb).
(8) 5V USB output for charging of phone in urgent.
(9) Pedal-assist and throttle two driving modes.
What is the disadvantage of EEKit e-bike kit?
(1) The phone APP and the LCD display could not work at the same time.
(2) The motor cable may be longer on some bikes.
(3) The price is a little higher than a general hub motor conversion kits.
(4) It works with a front fork with 100*10mm quick released, not with 110*15mm thru-axle.
How to install the front wheel electric bike conversion kit EEKit?
Step 1: Take off the brake clamp, take off the front wheel from your bike.
Step 2: Install the new EEKit wheel onto your bike. Test the rotation of the EEKit, and then fix it with the washers and nuts.

Step 3: Install the brake clamp.
Step 4: Install the bottle battery onto the down-tube. ( Please noted that the battery could not be parallel or perpendicular to the ground).
Step 5: Remove the right grip, slid the thumb throttle (accelerator) onto the handlebar.
Step 6: Install the Bluetooth LCD Display (if you have it) onto the handlebar.
Step 7: Connect the motor and the thumb throttle to the battery. Test all the function to make sure all work. Zip-tie the wire neatly to the frame.
Step 8: Go out for a test ride and enjoy your new electric bike!
You can read the EEKit manual before installation and use.
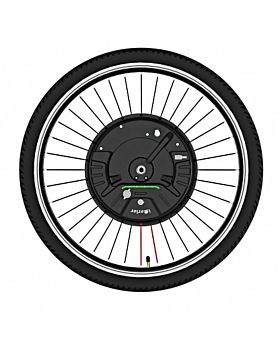
D. Electric bike conversion kit rear wheel- SMA-Q

|
Feature Motor: 36V 250W or 350W Geared Motor torque: 30Nm or 48Nm Battery: 36V 7Ah LG lithium battery. Charge time 3 hours. Max speed: 32km/h ( 19.9mph, could be limited by setting) Range: 65km (40mi ). Weight: 13.7 pounds. Smartphone App: No. Wheel size options: 20”, 26”, 27.5”, 700C, 29” Connected cables: 2
|
Package including Rear wheel ( Rim+ spokes+ motor + freewheel ) * 1 Battery + controller * 1 Charger * 1 LCD * 1 Nut and washer set * 1 Manual *1
|
What is the advantage of SMA-Q e-bike kit?
(1) Street legal, the max speed is 32km/h and it could be limited to 25km/h or smaller by LCD setting.
(2) There are a wireless module and gyro sensor in the controller, could sense the speed and brake to offer different levels of assist power and cut off the power when brake, do not need the PAS and electric brakes.
(3) Different Rim for choice, 26”, 700C, or the motor kit without any rim.
(4) 36V removable bottle battery is easily taken off to charge at home.
(5) Waterproof cables, battery and controller and motor well seal, the grade is IP65.
(6) The system is smooth, stable and intelligent.
(7) 5V USB output for charging of phone in urgent.
What is the disadvantage of SMA-Q e-bike kit?
(1) No phone APP.
(2) Pedal-assist only, without throttle.
(3) The motor cable may be longer on some bikes.
(4) The price is a little higher than a general hub motor conversion kits.
How to install the rear wheel electric bike conversion kit SMA-Q?
Step 1: Remove the brake clamp and the derailleur and the chain, take off the rear wheel from your bike.
Step 2: Remove the tire from the rear wheel and install it to the SMA-Q rim.
Step 3: Install the SMA-Q wheel onto your bike. Test the rotation of the SMA-Q, and then fix it with the washers and nuts.
Step 4: Install the chain and derailleur, and test if the derailleur works well.
Step 5: Install the brake clamp, and test the brake function.
Step 6: Install the bottle battery onto the down-tube. ( Please noted that the battery could not be parallel or perpendicular to the ground).
Step 7: Take off one grip, slip the LCD onto the handlebar.
Step 8: Connect the motor and the LCD to the battery. Test all the function to make sure all work. Zip-tie the wire neatly to the frame.
Step 9: Go out for a test ride and enjoy your new electric bike!
You can read the SMA-Q manual before installation and use.
E. Electric bike conversion kit rear wheel- (250W to 1000W) rear hub motor kit G-EBK
|
Feature Motor: 36V or 48V 250W or 350W or 500W or 750W or 1000W Geared or Gearless Battery: 36V or 48V 10.4Ah or 11.6Ah, 13.6Ah,14Ah, 17.5Ah, 20Ah Max speed: 25-50km/h Range: depends on the lithium battery capacity Weight: 7-12kg (without battery) Smartphone App: no Wheel size options: 16”, 20”, 26”, 27.5”, 700C, 29” Connected cables: 6 |
Package including Front wheel ( rim+ spokes+ motor ) * 1 Battery * 1 ( Optional) Charger * 1 ( Optional) Controller * 1 LED or LCD * 1 Thumb throttle * 1 PAS *1 Eletric brake levers * 1 Nut and washer set * 1 |
What is the advantage of the G-EBK e-bike kit?
(1) The price is lower compared to other hub motor kits.
(2) Different Rim and tires for choice to fit different bike, 16", 20", 24", 26", 700C, 27.5", 29", with different tire width such as 1.75", 1.95", 2.125" etc.
(3) There are more choices for different motor power and battery capacity- 36V or 48V 250W, 350W, 500W, 750W, 1000W motor, 10.4Ah, 11.6Ah, 13.6Ah,14Ah, 17.5Ah, 20Ah lithium battery etc.
What is the disadvantage of the G-EBK e-bike kit?
(1) The installation is complex, needs a longer time to confirm all the cables and connect all the parts- motor, battery, controller, display, PAS, electric brake levers. For a new starter, it is hard to complete the conversion.
(2) Before installation, you need a controller wiring diagram, then check whether all the parts cables could match the controller cable. Note that anyone cable connected wrong will lead to failure.
(3) The cable's connector which the waterproof function is a little weak.
(4) The power assistance depends on the assist level on LED/ LCD and the rotate PAS, sometimes it is not sensitive nor stable.
(5) When choosing a battery, need to confirm the battery voltage and current are compatible with the kits, and the battery cable connector matches the controller.
How to install the rear wheel electric bike conversion kit G-EBK?
Step 1: Remove the brake clamp and the derailleur and the chain, take off the rear wheel from your bike.
Step 2: Remove the tire from the rear wheel and install it to the G-EBK rim.
Step 3: Install the freewheel and the disc brake rotor ( if need them)
Step 4: Install the G-EBK wheel onto your bike. Test the rotation of the G-EBK, and then fix it with the washers and nuts.
Step 5: Install the chain and derailleur, and test if the derailleur works well.
Step 6: Install the brake clamp, and test the brake function.
Step 7: Take off the grips, slip the LED or LCD onto the handlebar.
Step 8: Slip the throttle onto the handlebar.
Step 9: Slip the electric brake levers on the left and right side of the handlebar, re-install the grips.
Step 10: Remove the left side of the crank arm, install the PAS onto the left side of the bottom bracket.
Step 11: Install the controller with a controller case or bag on a workable position.
Step 12: Install the battery in a workable position.
Step 13: Connect the controller to all electric parts- battery, motor, display, PAS, throttle, electric brake levers according to the controller wiring diagram. Test all the function to make sure all work. Zip-tie the wire neatly to the frame.
Step 14: Go out for a test ride and enjoy your new electric bike!
F. Electric bike conversion kit Mid motor- BAFANG BBS

|
Feature Motor: 36V or 48V, 250W or 350W or 500W or 750W or 1000W Motor torque: 80Nm or 100Nm or 160Nm Battery: Optional Charger: Optional Max speed: (depends on motor power) Weight: 10-13 pounds ( without battery ) Smartphone App: No Wheel size options: 20”, 24”, 26”, 27.5”, 700C, 28”, 29” Connected cables: |
Package including Mid motor with integrated controller * 1 LCD C961 or C965 or 850C * 1 Thumb throttle * 1 Speed sensor and wheel magnet *1 Electric brake levers * 1 Crank-set (chain wheel, crank arm) * 1 Allen bolts and screws set * 1 |
What is the advantage of the BAFANG BBS mid motor kit?
(1) The mid-motor is in the center of the bike providing a perfect balance and low gravity, making the bike more stable.
(2) The mid-motor driving shows a good performance on different terrain, even as an off-road climber.
(3) This entire system with controller and components is only about 10 pounds.
(4) The lightweight adding on the bike and no heavyweight in the wheel allows flexible control, even doing tricks.
(5) The controller is built into the motor with fewer wires to be hidden.
(6) Fits almost all standard bike frames with 68-73mm bottom bracket (100mm or 120mm for option).
What is the disadvantage of the BAFANG BBS mid motor kit?
(1) The installation is tricky, and you need to prepare specialized tools for the installation.
(2) The price is more expensive than a hub motor conversion kits.
(3) The power is transferred through the transmission system(chain, cogs, derailleur, etc.) that it is easier worn and need to be replaced more frequently.
(4) It is complicated and cost high for maintenance.
How to install the BAFANG BBS mid motor kit?
Step 1: Prepare the needed tools
① A full set of Allen keys- For installing the chain-wheel, removing and re-installing the pedal crank arms, installing the fixing plate, removing and re-installing the brake levers, installing the LCD display, etc.
② Screwdrivers - For installing the chain-wheel and chain-wheel cover onto the mid-motor
③ Crank puller - For removing the pedal crank arms and crankset
④ Bottom bracket remover - For removing the bottom bracket
⑤ Bafang lock-nut spanner (specialized) - For tighten the Bafang M33 nuts
⑥ Chain breaker- For removing the front derailleur or adjusting the length of chain
⑦ Scissors and zip-tie straps - For tying the wire neatly to the frame

Step 2: Remove the crank arm, the chain wheel and bottom bracket from your bike.
Step 3: Remove the Grips, brake lever.
Step 4: Install the chain-wheel and its cover onto the BAFANG BBS mid-motor, Slip the mid-motor kit from the right side into the bike bottom bracket housing, fix the motor with the Y-shaped fixing plate and the M33 lock-nut. Adjust the motor position and tighten the M33 lock-nut.

Step 5: Install the crank arm and pedal. ( please note the “L”- left or “R”-right mark on them.)
Step 6: Remove the front derailleur ( if any) with a chain breaker. Install the chain on the chain-wheel.
Step 7: Install the battery, display, throttle, brake lever or brake sensor, and the speed sensor ( the magnet should align to the sensor point and the distance should be smaller than 5mm).

Step 8: Connect all the cables well and have a test.
G. Electric bike conversion kit Mid motor- Tongsheng TSDZ2

|
Feature Motor: 36V or 48V, 250W or 350W mid-motor Motor torque: 30Nm Battery: Optional Charger: Optional Max speed: 25km/h ( 15.4mph) Weight: about 10 pounds. Smartphone App: No. Wheel size options: 20”, 26”, 27.5”, 700C, 29” Connected cables: 3 |
Package including Mid motor with integrated controller * 1 VLCD5 or XH18 or VLCD6 * 1 Speed sensor and wheel magnet *1 Crank-set (chain wheel, crank arm) * 1 Allen bolts and screws set * 1
|
What is the advantage of the TSDZ2 mid motor kit?
(1) The mid-motor is in the center of the bike providing a perfect balance and low gravity, making the bike more stable.
(2) The mid-motor driving shows a good performance on different terrain, even as an off-road climber.
(3) This entire system with controller and components is only about 10 pounds.
(4) The lightweight adding on the bike and no heavyweight in the wheel allows flexible control, even doing tricks.
(5) The controller is built into the motor with fewer wires to be hidden.
(6) Fits almost all standard bike frames with 68-73mm bottom bracket.
(7) The motor has an extra support mount - resulting in a much more reliable install than a Bafang BBS motor.
What is the disadvantage of the TSDZ2 mid motor kit ?
(1) The installation is tricky, and you need to prepare specialized tools for the installation.
(2) The power is transferred through the transmission system(chain, cogs, derailleur, etc.) that it is easier worn and need to be replaced more frequently.
(3) It is complicated and cost high for maintenance.
(4) No throttle (accelerator), it is a pure pedal assist bike.
How to install the TSDZ2 mid motor kit?
Step 1: Prepare the needed tools
① A full set of Allen keys- For installing the chain-wheel, removing and re-installing the pedal crank arms, installing the fixing plate, removing and re-installing the brake levers, installing the LCD display etc.
② Screwdrivers - For installing the chain-wheel and chain-wheel cover onto the mid-motor
③ Crank puller - For removing the pedal crank arms and crankset
④ Bottom bracket remover - For removing the bottom bracket
⑤ Spanner (specialized) - For tightening the M33.5 nut
⑥ Chain breaker (Not necessarily) - For removing the front derailleur or adjusting the length of chain.
⑦ Scissors and zip-tie straps - For tying the wire neatly to the frame
Step 2: Remove the crank arm, the chain wheel and bottom bracket from your bike.
Step 3: Remove the Grips, brake lever.
Step 4: Install the chain-wheel and its cover onto the TSDZ2 mid-motor, install the fixing plate. Slip the mid motor kit from the right side into the bike bottom bracket housing, fix the motor with the fixing plate and the M33.5 nut. Adjust the motor position and tighten the M33.5 nut.

Step 6: Install the crank arm and pedal.
Step 7: Install the chain on the chain wheel.
Step 8: Install the battery and the speed sensor.
Step 9: Connect all the cables well and have a test.
What is the best electric bike conversion kit?
You could see there are pros and cons for different electric bike conversion kit, it is hard or simply to say which is the best electric bike kit.
If you are a 40-60 years old person, like pedaling, on the flat roads always, the e-bike kit EEKit is recommended.
The installation is very easy, and the water-proof function is strong. It is easy to pedaling even when it is running out of power. Though the price might be a little higher than the general electric bike kit, the difference is less than 0.5USD per day.
If your bike loading heavy usually, please considering a rear wheel electric bike conversion kit, like the SMA-Q, or bigger power such as 1000W electric bike conversion kit rear wheel. They would offer a good traction and a big torque to your bike.
If you like cross-country, BAFANG BBS is a good choice, together with a big capacity lithium battery.
Considering your request- Price, application, you could choose the best electric bike conversion kit for yourself.

Sign In
Create New Account